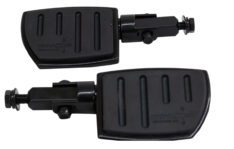
RIVCO Highway Peg Mounts for Honda® Gold Wing

  • 20190530_140310
  • 20190530_140218
  • 20190530_140143
  • 20190530_140140
  • 20190530_140143
  • 20190530_140156
  • 20190530_140210
  • 20190530_140320
  • 20190530_140331
  • 20190530_140341
  • 20190529_143933
  • 20190529_144726
  • 20190530_140310
  • 20190530_140218
  • 20190530_140143
  • 20190530_140140
  • 20190530_140143
  • 20190530_140156
  • 20190530_140210
  • 20190530_140320
  • 20190530_140331
  • 20190530_140341
  • 20190529_143933
  • 20190529_144726
SKU:
GW004
Tags:
,
Weight:
3.65 lbs
Shipping Dimensions:
9 × 4 × 3 in
view all details

Price

$329.95

Quantity

- +

Total

$329.95

1 review

- +

18'-19' Gold Wing

Description

  • Strong laser cut steel construction
  • Adjustable highway mounts
  • Easy bolt on installation
  • Black powder coated
  • Includes black wide pegs
    Fits: 2018 and newer Honda® Gold Wing models

Additional information

Weight
3.65 lbs
Shipping Dimensions
9 × 4 × 3 in

Reviews (1)

Add a Review

  • (verified owner)

    I received these last week. Took me about 45 minutes to round up the tools and install these. I went out for a ride this past Sunday and they worked great, no worries in the corners. Overall the build and finish are high quality. I would not hesitate to recommend these.

Installation Guide

GW004
Highway Peg Mounts for 2018 and Newer Honda Gold Wing Models


  1. Lay out and make yourself familiar with the supplied components and fasteners. Starting on the right side and referring to photo (1) Remove the 6mm Allen bolt located between the front and middle exhaust pipe (photo 1A).
     
  2. Locate the split clamp assembly marked “R” (photo 2 A). Referring to photo (3) remove the 8 x 85mm bolt with washers, and  separate the tRRRRRwRo halves as shown.
     
  3. As shown in photo (4) place the two halves around the black engine guard tube and engage the pin located at  the end of one half (3A)    into the mating hole on the other half of the clamp (3B).
     
  4. Rotate the clamp assembly counterclockwise so that the two halves come together and the 8mm bolt holes align. As shown in photo (5A) align the holes in the clamp halve with the hole at (1A). Install the 8x85mm bolt with washers and tighten securely (14-16 ft. lbs.).
     
  5. Install one of the peg mounting arms (5B) as follows. Place a washer and lock washer onto one of the supplied 7/16” x3/4” bolts. Place this thru the arm as shown (5C). Place one of the star or toothed washers onto the threads of the bolt (5D). The star or toothed washer should be between the arm and the mount. Bolt this onto the mount as shown, adjust the arm to the desired position or angle then tighten the 7/16” bolt securely (22-28 ft. lbs.). Install the peg of your choice in the remaining hole at the end of the arm.
     
  6. Install the left mount and arm in the same manner. After installing both side sit on the bike, adjust the arms and pegs to your liking and retighten all bolts securely.

NOTE: Use caution when setting the arms and pegs to mid to lower heights as this will limit severe lean angles and aggressive cornering and can drag when riding under these conditions.

Thank you for purchasing a RIVCO Product.


RIVCO Logo_Oval_BlackandWhite

RIVCO Products, Inc. 440 S. Pine St., Burlington, WI. 53105   262-763-8222

To register your warranty and see many other cruiser and bagger accessories, please visit our website.

www.rivcoproducts.com